How to Share Host resources with Virtual Machine in Hyper-V
Sharing physical resources is the primary purpose of virtualization. in Hyper-V we assign physical resources like; CPU, RAM, and disk space for every Virtual Machine at the time of configuration. But other resources like External disks, USB flash drives, and other plug play are configured when needed. In this article, I explain how to share host resources with the virtual machine in Hyper-V.
In Hyper-V, even if you want to copy a file from the USB flash drive to your virtual machine, you have to go a long way: You must create a virtual switch, connect your host and virtual machine to the same virtual switch, and give your virtual machine access to your USB flash drive. I will go through this process step by step in this article.
Create Virtual Switch in Hyper-V
When you create a Virtual Switch in Hyper-V, you will see three types of virtual switches. Each of these switch types has its advantages, so you have to choose the right type of Switch.
External Switch
External Switch provides a connection between virtual machines, hosts, and the physical network. It means that your virtual machine can connect to the internet as well. When you connect your virtual machine to an external switch, your virtual machine will be accessible by the host, physical network and the internet.
Internal Switch
You can use an Internal switch to separate your host network from your virtual network. Your virtual machines can communicate with each other and with the host, using an internal switch. But can not communicate with the physical network.
Private Switch
Virtual machines connected to a private switch can communicate with each other, but can not communicate with the host or physical network.
Now that you have understood virtual switch types follow the steps below to create a virtual switch.
1. Open Hyper-V Manager and click on Virtual Switch Manager.

2. Click on the New virtual network switch and select External, Internal or Private, then click on Create Virtual Switch. To share local resources with a virtual machine in Hyper-V, you must create an external switch or internal Switch because just external and internal switches provide the connection with the host. A Private Switch doesn’t provide the connection between virtual machines and the host machine.
3. Name your virtual Switch; you can see it as you type the name. Choose the Internal network connection type for your virtual Switch, then press OK.

Now that you have created a virtual switch make sure that it has been created appropriately by clicking on Virtual Switch Manager in Hyper-V Manager. You can change your switch type easily from Virtual Switch Manager. Now let’s connect the virtual machine to the virtual Switch.
Check out if you want to know how to create a virtual switch by using Windows PowerShell.
Connect Virtual Machine to Virtual Switch
Both the host and the virtual machine must be connected to the same virtual Switch in order to share your host resources with the virtual machine. When you create an external or internal switch in Hyper-V, your host connects automatically to that Switch, but your virtual machine doesn’t. You have to connect your virtual machine to the virtual switch manually. I explain how to connect the virtual machine to the virtual switch step by step.
1. Open Hyper-V Manager, right-click on the name of your virtual machine and click on Settings. Or, if your virtual machine is running, maximize your virtual machine window and click on the File and click on settings.
2. Click on Add Hardware, select Network Adapter and click on Add.
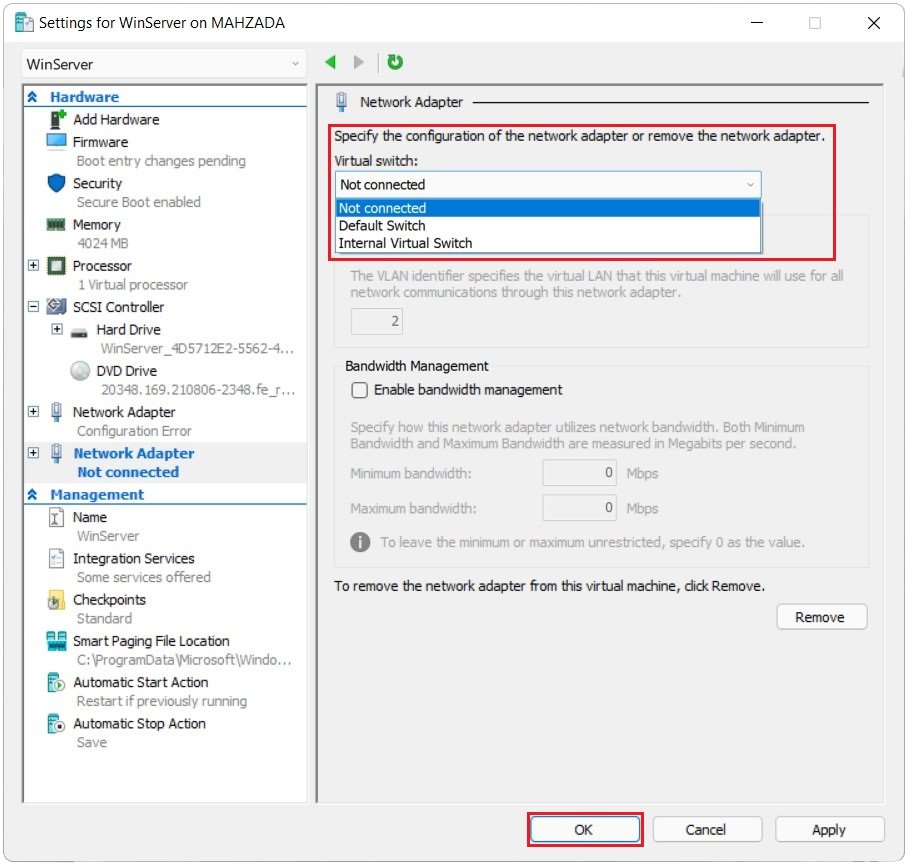
3. Select the virtual Switch from the list and click OK. You can also remove any virtual switch that is not needed by selecting that virtual Switch and clicking on Remove.

4. Before you go to share local resources in Hyper-V, make sure that your host is connected to your virtual Switch. Open Control Panel, click on Network and Internet, and then click on Network and Sharing Center.
When creating a virtual switch, make sure it is the right type of Switch that you need. If you want to connect your virtual machine to the internet, create an external switch, and if you’re going to separate your virtual network from the host network, then create a Private Switch.
Configure to Share Host’s Local Resources With Virtual Machine
You can share; printers, clipboards, external hard disks, internal disk drives, USB flash drives, and other plug and play devices from the Local Resources. In Hyper-V, if you want to copy a file into your virtual machine, it doesn’t provide you with the copy and paste option from the host to the virtual machine, so you have to share it via file-sharing or share the disk or USB itself. Follow the steps below to configure resource sharing.
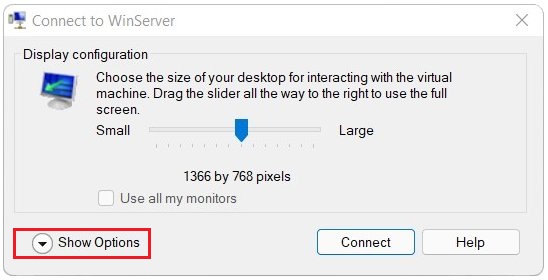
1. Right-click on the Virtual Machine name and click on Connect. The following screen appears, then click on Show Options.

2. Click on Local resources to see local devices, check the devices you want to share with the virtual machine, and then click on Connect. If the resource you want to share is not in the list, click on More.
3. The following screen appears, select your resource from that list and click OK. I want to share Local drive C and a USB Pendrive which is plugged into my computer.

4. After your virtual machine is connected, log in with a username and password. Check the File Explorer, drive and devices you shared before will appear under Redirected drives and folders.
Sharing local resources look complicated, but it gets easier when you understand the process well. If you create the correct type of switch, connect your host and virtual machine to the virtual switch properly, so you will not find issues to share local resources with the virtual machine in Hyper-V.
Check out this article to know more about the installation of Hyper-V on Windows 11 and Windows Server 2022.
Check out this article if you want to know How To Connect Hyper-V Machines To Internet?
