Generally, an IP address is a unique identification number assigned to devices on the network to let them communicate with each other. When you connect to a network, either you receive the IP address manually (Statically) or dynamically. Although, most users connect to the internet without knowing the IP address of their device because the DHCP assigns the IP address dynamically. But sometimes, for example, users decide to connect remotely or configure their device as a server; in such cases, you need to have a stable IP address. In this article, you will learn how to set a static IP Address in Windows 11 using the command prompt and control panel.
If you are using Windows 10, check the How To Configure Windows 10 IP Address With CMD?
Set Static IP Address on Windows 11
There are two common versions of IP: IPV4 and IPV6. The IPV4 has four hexadecimal numbers separated with a dot or period (.), such as 192.168.1.1, while IPV6 has six hexadecimal numbers separated with a colon (:). You are going to learn how to set IPV4 on Windows 11.
Setting IPV4 using Command Prompt
To set the static IP address via the CMD, which is an easy and quick way, go with the following steps:
- Search the Command Prompt or CMD in the Search Box or the Start Manu and run it as administrator.
- Before you start setting the static IP address, you must see the current configuration of your network because you will need some of that information later. Write in the command prompt
IPConfig /alland enter.

3. Now that you have taken note of the name of the adaptor and default gateway and the current IP address, you can go ahead and change your IP address. Take in mind that your IP address should not be in the scope of the DHCP server; else, you will not get access to the network. Additionally, the default gateway must be the IP address of your ISP. Write down the following command in the command prompt: Netsh interface ip set address name =”Name_of the Adapter” static New_IP_Address Subnet Mask Default gateway and enter.
4. You just assigned your static IP address. It’s time to set the static DNS address for the static IP address: Netsh interface ip set dns name =”Name_Of_The_Adapter” static DNS_Address and Enter.

How to Set the Static IP graphically?
You can set the IP address graphically in two ways (methods):
First Method: System Settings
- Right-click on the network icon on the taskbar and click on the Network and Internet Settings.
- In the settings window, click on Properties.
3. You see an Edit button in front of the IP assignment; click on it, and in a new tiny window, open the top-down menu and select the Manual and turn on the IPv4 or IPv6 accordingly. (Here I go with the IPv4)

4. In the new windows, Enter the desired IP address and subnet mask (be careful, the IP address should not be in the scope of the DHCP server). Additionally, there you should enter the Gateway and Preferred DNS as well. The gateway address must be the same as the IP address of your ISP. And the DNS can be the address of any related DNS server; people mostly use the Google DNS Server address, which is 8.8.8.8
5. After you have entered all the required addresses, click Save. The internet connection of your computer will be down for a short time and will reconnect soon.
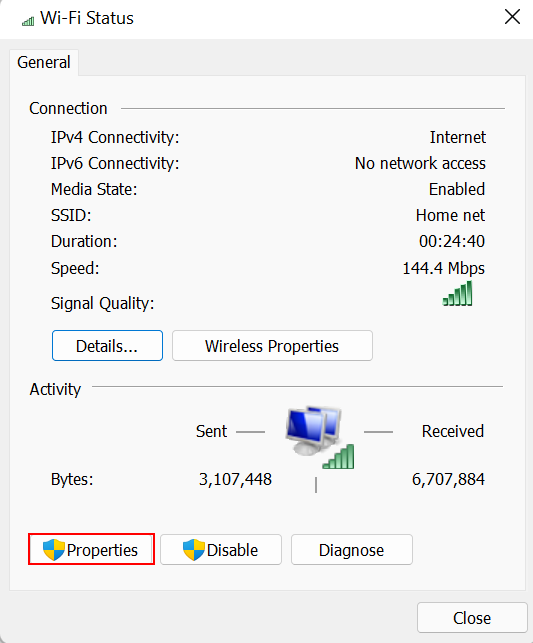
Second Method: Control Panel
The second way to set a static IP address on Windows 11 is through Control Panel.
- Search and open Control Panel, click on the Network and Internet, and click on the Network and Sharing Center.
- In-Network and Sharing Center window, click on Connections Wi-Fi, and in the Wi-Fi or Network Status window, click on the Properties, find Internet Protocol Version 4 (TCP/IPv4), and double click on it.
3. Check to Use the Following IP address and enter the desired IP address, subnet mask, and default gateway. Then click on the Use the following DNS server addresses and enter the preferred DNS server address.
To conclude, the static IP address is a fixed address that is not changing with every restart of your system. For any questions, go to the comment section of this page and write them down.