How to Manage Hard Disk with Command in Windows 10?
The storage management or hard disk management is easy with the command line as GUI disk management on Windows. Here we just focus on this topic to manage hard disk using the command on Windows 10 and other Windows operating systems. Manage Hard disk with command-line tool DiskPart.
The Disk Partition Utility (Diskpart) is a command-line tool for managing hard disk in Windows operating system. Diskpart has replaced with FDisk command-line tool which works with the MS-DOS-based operating system.
Manage Hard Disk using Command Line
Diskpart can be used on both command prompt and PowerShell. But, you must well be understanding what you are doing when using Diskpart. It might happen much time which formatted the entire disk with one command. The last one was a Laptop of my friend with lots of memorial photos and videos. Fortunately, we had recovered all data successfully with data recovery software. But take too us much time.
Manage Hard Disk using Command Line in Windows 10:
- Open command line or PowerShell.
- Run DiskPart as Administrator privilege.
- Clean Hard Disk with Command-Line.
- Create Partition with Command.
- Format Hard Disk with Command.
- Delete Partition.
- Extend Partition with Command-Line.
- Shrink Partition with Command.
That’s all you will learn from reading this article about tips to manage hard disk using the command line in the Windows environment. Let’s start it with running DiskPart as administrator privilege on Windows 10. You can use this command on other Windows operating systems as well.
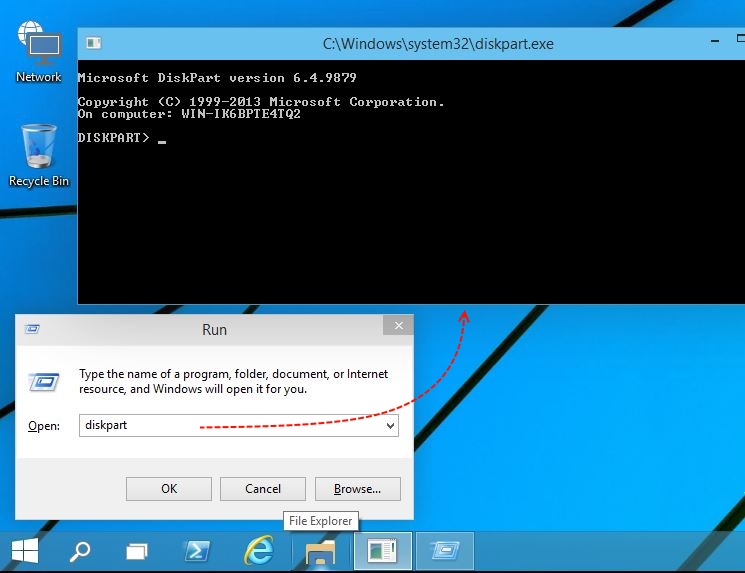
- Press Windows+R to open the Run and type “diskpart” then press enter to run the DiskPart utility.
- Click Yes to User Account Control prompt.

1. Create Partition with Command
You may want to list installed hard disks of the system. Just type ‘list disk’ then press enter to display all connected hard disks of your PC. The List disk command only shows the normal hard disks on your computer. If your hard disk is corrupted, it’s not possible to display with DiskPart List Disk command.
1. Type “List Disk” to view all hard disks.

2. In this PC we have two hard disks. You must select the correct disk you want to manage with the command line. Choose the disk with select disk command.
For example, you want to select disk 1. Type “select disk 1” command and press enter. Now the disk one has chosen as the disk you want to manage it with the command line.

To see whether the disk has selected or not, just type “list disk” and see the result. The strick in front of Disk 1 shows that disk one is selected and ready for management.
2. Clean a Partition Using DiskPart
Now clean the disk by ‘Clean’ command.
- Type “clean” and press enter to clean disk with command.

That’s all command to clean a disk with DiskPart command. Let’s create a new partition with command.
3. Create a Partition with Command
To create a partition with command just type “Create partition primary size=40000″ and press enter. This command will create a 40 GB primary partition from disk 1. You can assign the size of your partition according to your hard disk capacity.
1. Type “create part primary size=50000” then press enter.

2. To check the created partition type ‘List vol’ command. The command will list all volumes. On the below screenshot Volume 3 is the created partition with 39 GB space.

The last Volume 3 is the newly created partition. It is selected and ready to format it.
4. How to Format Partition with Command?
- Type ‘format fs=ntfs quick’ to format the partition, and type ‘list vol’ to see the formatted partition with NTFS file system.

You can see the result of Diskpart format partition. It shows volume 3 has formatted as NTFS type. Next, assign a letter to the newly formatted partition.
2. Just type “assign letter=f” and press enter. The F letter has assigned to volume 3. Now it appears as F local drive on File Explorer.

Now you have learned creating, formatting and some diskpart commands for managing hard disk with the command line in Windows 10. The next step is using some more DiskPart command to get expert on Diskpart disk management tool.
5. How to Delete a Partition with Command?
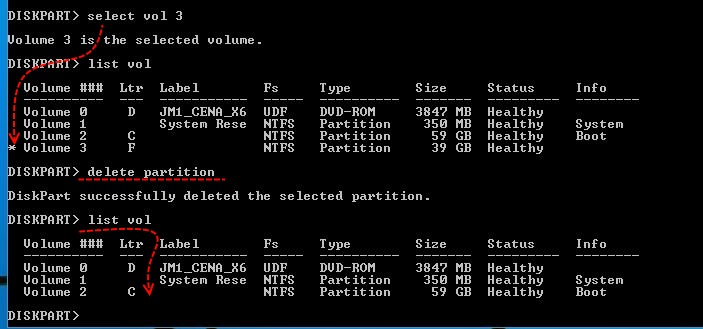
- To delete a partition or volume with command first select volume then type “delete partition.” Like screenshot.

Yes, you can see the result, the partition ‘Volume 3’ has deleted successfully.
6. How to Extend a Partition with Command?
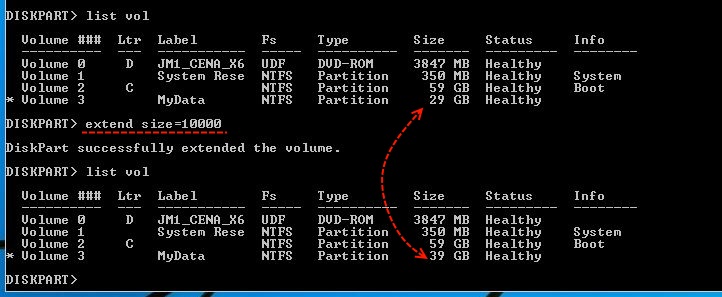
The extended process is to add some more space to existing partition from the free space of a hard disk. To do this, just follow the screenshot.
- List the volumes with “List vol” command.
- Type “extend size=10000” to add extra 10 GB to volume 3 from the free spaces of the hard disk.

The ‘Extend size=10000’ will add 10 GB to the Volume 3 partition. If you don’t mention the size, the system will add all free space.
6. How to Shrink a Partition with Command?
It is the best option for a newly purchased laptop that only has one drive on its hard disk. You can use DiskPart shrink command to shrink the extra free spaces of a drive. Shrink a volume is to create unallocated space from free spaces of an existing partition.
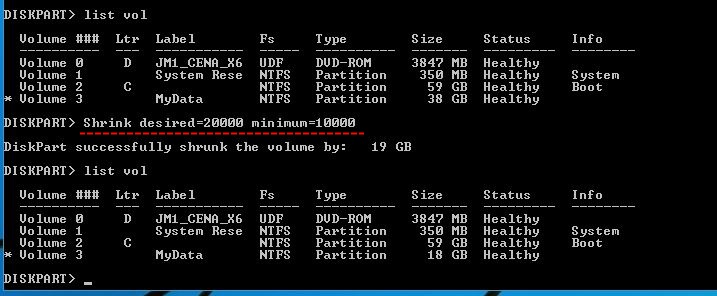
- Type “List vol” to see all volumes.
- Just type “shrink desired=20000 minimum=10000” then press enter.

The Diskpart shrink command has shrunk 19 GB from the Volume 3 successfully.
Finally, I hope this article helps you manage the hard disk using the command line easy. If you have any issue with disk management or DiskPart commands, please comment us.
Searches related to:
Disk Management command prompt
Windows Disk Management command line
Disk Management Windows 7
Disk Management Windows 8
Disk Management software
Windows 10 Disk partition
Windows 10 Disk Management not working
Disk Management partition

Thanks for this useful tutorial.
THANK YOU TECHNIG, THIS HELPS A LOT.