In previous tutorial you have learned what GreenSock animation platform is and why we use it. In this article, you will learn how to use GreenSock animation in your first project. You will also learn GreenSock animation setting up and configurations. Overall, we will make our first project and environment for our project. Beside this, you will learn how to animate elements or any other object with GreenSock.
GreenSock Animation Setting up
As promised, we will will write clean and to the point. So, to use GreenSock, all you need is to download the framework and add it in your project and than write your animation code. We will use codepen instead of saving the file locally. If you want to so, you can fork our project and make changes for your own. Let’s start doing it step by step.
- Create a pen on Codepen. ( if you want, you can fork our project here ).
- Add the GreenSock and jQuery.
Of course you will need jQuery as well, so we will add jQuery first, than GSAP. In codepen, you can like this.
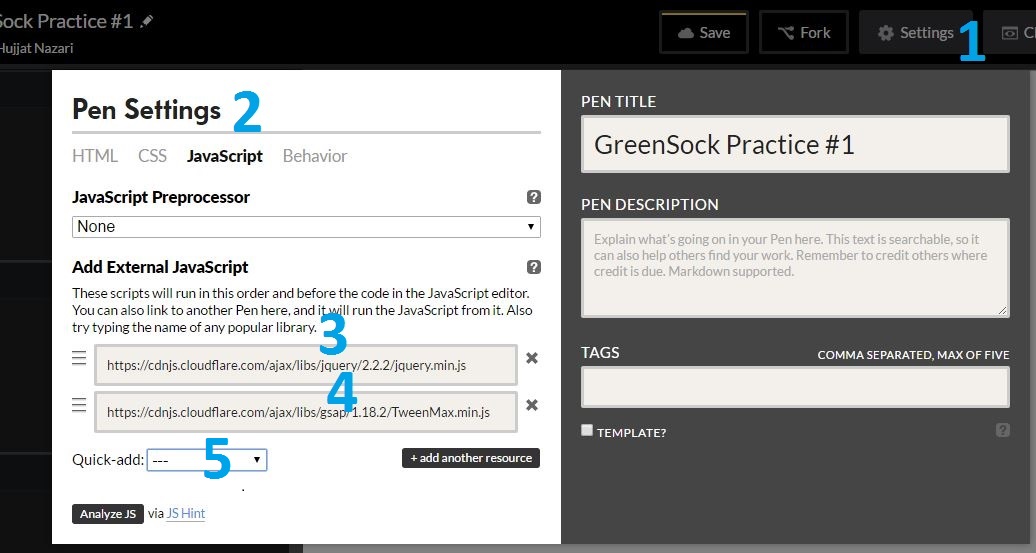
- Settings
- JavaScript tab
- jQuery cdn link
- TweenMax cdn link
- We have added it through Quick-add.
Once you have added them, you are done with GreenSock animation setting up. Now you can start writing your code.
Here a simple html code:
<div class="object">
  <p>
     Move me with GreenSock
  </p>
</div>
Here is some basic CSS style.
.object{
  background-color: blue;
  width:170px;
  padding:30px;
  color:#fff;
}
So far we had just write the basic codes. Now let’s start learning the GreenSock syntax.
First, let’s select the item class with jQuery
var item = $('.object');
Now, you can apply the GreenSock functions to variable item. The most common type of tween is a to () tween which allows you to define the destination values:
TweenLite.to(myObject, 2, {x:100, y:200});
For our example, let’s more our item 300px to the right direction. To do that, add the following code to your JavaScript code.
TweenLite.to(item, 2, {x:300});
The TweenLite is the class name and the to() is the function.
The first arguement is the object you want to apply the animation on.
The second arguement is for time set or How much time it should take.
The third arguement, you can add an array of different affects.
In our example, it will more the item element to x direction in 2 second.
Here is the completed pen.
Conclusion
It was about the basic of GreenSock animation and GreenSock animation setting. We will continue this tutorial series with intermediate and advance level of GreenSock animation. I hope it has been informative for you, if you any question, feel free to comment it bellow. 🙂