How to Enable Telnet and SSH on Cisco Router and Switches?
Configure SSH on Cisco Router and Switch step by step guide
This article is going to shows the CCNA students to configure and enable telnet and ssh on Cisco router and switches. The Telnet is an old and non-secure application protocol for remote control services. You can configure telnet on all Cisco switches and routers with the following step by step guides. But it’s not the best way to the wide-area network. However, we just going to enable telnet and ssh to test them for CCNA Certification exams.
Enable Telnet and SSH on Cisco Router
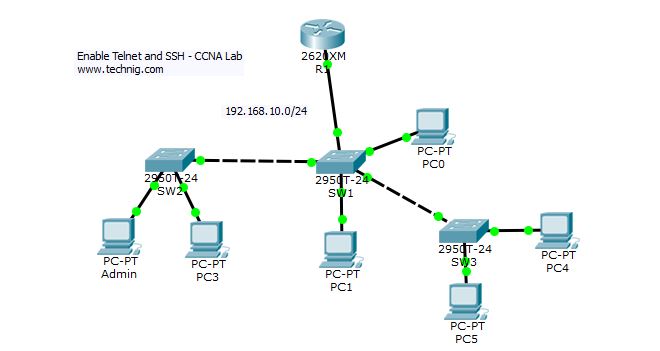
To enable telnet on Cisco router, simply do it with “line vty” command. First of the first download the CCNA Lab to Enable Telnet and SSH on Cisco Router from Telnet and SSH Lab. The Lab is configured with DHCP server and all clients get an IP address from DHCP Server on Router.

Go to router R1 console and configure telnet with “line vty” command.
R1>enable
R1#configure terminal
Enter configuration commands, one per line. End with CNTL/Z.
R1(config)#line vty 0
R1(config-line)#password Pass123
R1(config-line)#login
R1(config-line)#logging synchronous
R1(config-line)#exec-timeout 40
R1(config-line)#motd banner $Admin Access Only$
R1(config-line)#exit
R1(config)#
- The “line vty” command enable the telnet and the “0″ is just let a single line or session to the router. If you need more session simultaneously, you must type “line vty 0 10“.
- The “password” command set the “Pass123” as a password for telnet. You can set your own password.
- The “login” command authenticate and ask you the password of telnet. If you type “no login” command, the telnet never authenticates for the password which is not a good practice in a real network environment.
- The “logging synchronous” command stops any message output from splitting your typing.
- The “exec-timeout” command just sets the time-out limit on the line from the default to “40″ minutes.
- The motd-banner forces a banner message to appear when logging in.
OK, the Telnet services enabled successfully. But you must set the enable password for the router in order to control it remotely.
R1(config)#enable password Password
R1(config)#exit
Testing Telnet Connectivity
Now from a client PC test the telnet connectivity and to ensure that it works fine or not yet. If it does not work, try to troubleshoot telnet errors.
Let’s test telnet from the admin PC. Type telnet 192.168.10.1 and press enter, then enter the telnet password. Next type enable command and press enter, then type the router password.
Packet Tracer PC Command Line 1.0
PC>telnet 192.168.10.1
Trying 192.168.10.1 ...Open

User Access Verification

Password:
R1>enable
Password:
R1#
Now you are remotely connected to router R1 and you can execute all router commands through a telnet command-line interface.
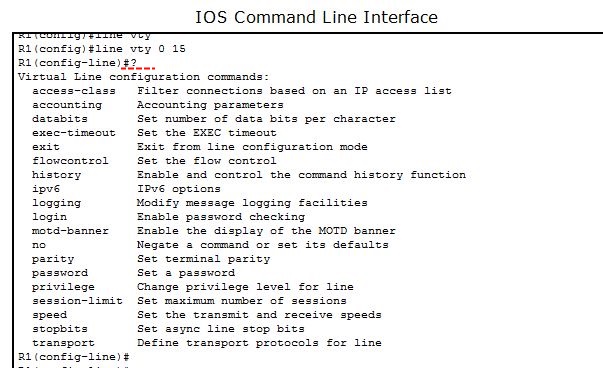
If you need more information about Telnet commands and options, from the config-line mode type “?“, the question mark will display all telnet commands.

That is it, the telnet services configuration on Cisco router.
2. Enable Telnet and SSH: SSH Configuration.
Secure Shell or SSH is a secure protocol and the replacement for Telnet and other insecure remote shell protocols. So for secure communication between network devices, I strongly recommend using SSH instead of Telnet.
Configure SSH on Cisco routers and switches with the below step by step guide to SSH configuration.

1. Open the router R1 console line and create domain and username.
R1(config)#ip domain-name Technig.com
R1(config)#username Shais Password Pass123
R1(config)#
Then “IP domain-name” command creates a domain and named Technig.com.
The “username Shais Password Pass123” command just create a username “Shais” with “Pass123” password.
2. If you don, just follow and generate the encryption keys for securing the ssh session.
R1(config)#crypto key generate rsa
The name for the keys will be: R1.Technig.com
Choose the size of the key modulus in the range of 360 to 2048 for your
General Purpose Keys. Choosing a key modulus greater than 512 may take
a few minutes.

How many bits in the modulus [512]: 1024
% Generating 1024 bit RSA keys, keys will be non-exportable...[OK]

R1(config)#
Type “crypto key generate rsa” command and press enter when asking you “How many bits in the modulus [512]:” just type “1024″ and press enter. The system will generate 1024 bits keys to secure session lines. You can choose modules in the range of 360 to 2048.
3. Now enable SSH version 2, set timeout duration and login attempt time on the router. Remember this message if you going to use ssh version 2 “Please create RSA keys (of at least 768 bits size) to enable SSH v2.”
R1(config)#ip ssh version 2
R1(config)#ip ssh time-out 50
R1(config)#ip ssh authentication-retries 4
4. Enable vty lines and configure access protocols.
R1(config)#line vty 0
R1(config-line)#transport input ssh
R1(config-line)#password Pass123
R1(config-line)#login
R1(config-line)#logging synchronous
R1(config-line)#motd-banner
R1(config-line)#exit
R1(config)#
The configuration is the same as telnet, just the transport input ssh command change the line to Secure Shell. The configuration has completed, next, you must test ssh from a client PC.
Testing SSH Connectivity
From a client PC, open the command line and type “ssh -l Shais 192.168.10.1” then press enter.
Packet Tracer PC Command Line 1.0
PC>ssh -l Shais 192.168.10.1
Open
Password:

R1>enable
Password:
R1#configure terminal
Enter configuration commands, one per line. End with CNTL/Z.
R1(config)#
Here, I have connected successfully and the connection is secured with Secure Shell.
Hope you understand the configuration of enabling Telnet and SSH on Cisco router and switches. Now you should be able to simply enable Telnet and SSH on your routers and switches.

Why did you use line vty 0 instead of line vty 0 4 for Enable Telnet and SSH: SSH Configuration for #4?