Network discovery is a network setting that enables network computers’ names to be discoverable from the network. It works like a Bluetooth system. When you enable it, your device will be found by another device. Enabling network discovery via group policy is the best option to enable network discovery for all network machines through a Windows server. The same task can be used to disable network discovery on all network clients with group policy.
In this post, I will apply this policy to enable network discovery via group policy using Windows Server 2016 on Windows 10 clients. It works the same on Windows Server 2019, 2022, and Windows 11.
What is Network Discovery?
Before we start to apply the network discovery policy to the network clients, we should know about network discovery features and settings. For all Windows systems, the three network discovery states are:
-
On: This state allows your computer to see other network computers and devices and allows people on other network computers to see your computer. This makes it easier to share files and printers.
-
Off: This state prevents your computer from seeing other network computers and devices and prevents people on other network computers from seeing your computer.
-
Custom: This is a mixed state in which some settings related to network discovery are enabled, but not all of them. For example, network discovery could be turned on, but you or your system administrator might have changed firewall settings that affect network discovery.
Network discovery requires that the DNS Client, Function Discovery Resource Publication, SSDP Discovery, and UPnP Device Host services are started, that network discovery is allowed to communicate through Windows Firewall, and that other firewalls are not interfering with network discovery. If some but not all of these are true, the network discovery state will be shown as Custom.
How to Enable Network Discovery via Group Policy?
Let’s configure and enable network discovery via group policy on Windows Server 2016 to Windows Server 2022. This method works the same on all other Windows servers. In my testing lab, the server is Windows Server 2016 and the client machines are Windows 10.
The following are the step-by-step instructions in a real-world scenario:
- Log on to the Windows Server and open the Group Policy Management console by typing
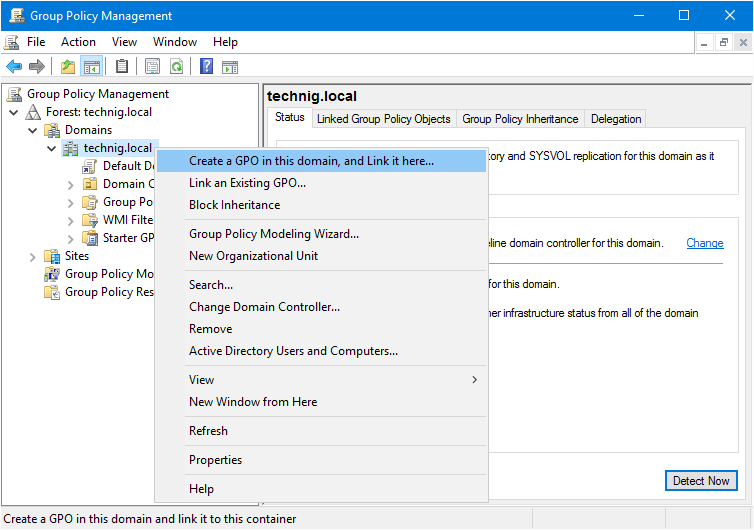
gpmc.mscin the Run dialog box. - Expand the Forest and Domains nodes, and then right-click the domain name. Select Create a GPO in this domain and link it here.

3. Name the new GPO Network Discovery or whatever you want. It’s better to name all the new GPO you have created with a meaningful name and must be related to the tasks you want to apply via the group policy template.
4. Right-click the created Network Discovery GPO and click Edit. Now you are going to edit this group policy template to enable network discovery via group policy.
5. On Computer Configuration, expand Policy – Administrative Templates – Network and select Link-Layer Topology Discovery. Right-click the first policy “Turn on Mapper I/O (LLTDIO) driver” and enable it. Tick the checkbox of Allow operation while in domain.
Note: LLTDIO allows a computer to discover the topology of a network it’s connected to. It also allows a computer to initiate Quality-of-Service requests such as bandwidth estimation and network health analysis.
6. Now enable Turn on Responder (RSPNDR) driver also. Do the same settings for Turn on Responder (RSPNDR) driver as above screenshot.
Note: The Responder allows a computer to participate in Link Layer Topology Discovery requests so that it can be discovered and located on the network. It also allows a computer to participate in Quality-of-Service activities such as bandwidth estimation and network health analysis. It enables Network Discovery via group policy.
7. Network Discovery enabled via group policy. Now type “gpupdate /force” to update the group policy on Windows Server. Execute the command on the client’s computer as well or it will apply automatically when the system restarts.
Everything is done successfully on the Windows server. The network discovery policy is now enabled for all client computers that are joined to the domain. To verify that the policy is working correctly, you can open the Network and Sharing Center on a client computer and check the Network Discovery setting. The setting should be On.
Enable Network Discovery via Windows Firewall
It is the second method to turn on network discovery via Windows Firewall. It also must be applied through group policy. So we already have a created GPO and try to edit it for enabling network discovery via Windows Firewall.
1. Open the previews created by GPO and edit them with the following steps. Navigate to Computer Configuration – Windows Settings – Security Settings – Windows Firewall with Advanced Security.
2. Now try to create a rule from Inbound Rules. Select Inbound Rules and right-click to create a New Rules.
3. So on the new New Inbound Rules Wizard page, select Predefined and choose Network Discovery.
4. On the Predefined Rules window, do nothing and click Next. These rules are predefined rules for network discovery and network monitoring, and network troubleshooting.
5. Finally, select Allow the connections and click Finish. The network discovery rules must be enabled successfully.
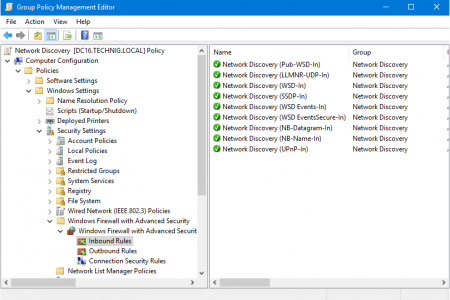
6. The result should be like the below screenshot. Next, you can disable network discovery with a Windows firewall from here. And disable network discovery via the preview section.
7. Close the Group Policy Management Editor page and run “gpupdate /force” command again to update the group policy.
Turn on Network Discovery on Windows 10
Let’s check the result of enabling network discovery via group policy on a Windows 10 client machine.
1. Open the Network from Windows 10 desktop. Bring Windows 10 desktop icons on the desktop, if you already don’t have them.
Here you see, the network discovery is turned off and the network computers are not showing from Network.
2. Open the command prompt and run “gpudpate /force” command to update group policy on Windows 10.
Now the network discovery has been enabled successfully on your all network servers and client machines. Try to work with group policy and get to learn more about settings and options. If you have any questions, don’t hesitate and ask us via comment.
Related Queries: Enable Network Discovery via Group Policy
Network discovery group policy Windows 10
Disable network discovery GPO server 2012
Network discovery GPO not working
Enable network discovery GPO server 2012
GPO turns on network discovery and file sharing
Group policy advanced sharing settings
Turn on the network discovery server 2016
Turn on the automatic setup of network-connected devices group policy

For Gods sake turn off the image that gets bigger and smaller, the whole page moves up and down while your trying to read it!
We have windows firewall turned off via group policy. Would this cause an issue with trying to implement this group policy configuration (referring to section: Enable Network Discovery via Windows Firewall) or can this section be skipped? Thanks.
Thanks! This was very helpful. 🙂