Enable and Configure Remote Desktop in Windows 11
The Remote Desktop allows a computer to access another computer through the local area network (LAN) or the internet. This software is pre-installed on the latest windows, but you have to enable it. There are many different ways to enable and configure remote desktop in windows 11.
Enable Remote Desktop in Windows 11 through Settings
To connect from one computer to another computer remotely, you have to enable the Remote Desktop on the target computer. Then connect the local management computer to the target computer. The target computer is the computer that you want to be managed, and the local management computer is the computer that connects to the target computer remotely and manages it.
To enable remote desktop go to Settings, System, and click on Remote Desktop.

When you get to the Remote Desktop window in Windows 11, basic settings have to know to configure well.
- Remote Desktop on-off button; you can switch On to enable remote desktop and Off to disable it.
- Require devices to use Network Level Authentication to connect (Recommended): it allows only the authenticated users (members of the Remote Desktop Users group) to connect. To enable this feature, checkmark the box for this feature.
- Remote Desktop port: the port that the remote desktop use to make a connection between devices is port number 3389
- PC name: you can use a computer’s PC name or IP address to connect to it remotely.
- Remote Desktop users: choose who can remotely access this PC, click on it and add the users and groups. I will explain how to add users and groups to the Remote Desktop Users group in more detail.
If the operating system you are using is not Windows 11, enable remote desktop through system properties. Enable remote desktop through system properties is the typical way in all windows. Now that you have enabled the remote in windows 11, you can scroll down to configure the Remote Desktop Users group.
Enable Remote Desktop through System Properties
There are different ways to enable and configure Remote Desktop, but allowing that from System Properties is expected in the latest windows. Enabling Remote Desktop from System Properties is the same in Windows 7 and later. Follow the steps below to access System Properties, and configure the remote desktop through System Properties.
- Go to Settings, scroll down, click on About, and then click on Advanced System Settings. Or Type the
sysdm.cplcommand in the Run.

- Click on Remote, and select Allow remote connections to this computer. If you want to allow specific users to connect remotely, select Allow connections only from Remote Desktop computers with Network Level Authentication (recommended). Then click on Select Users to specify users. Once the users have been added, click OK.
From the Settings and System properties, you can specify which users or groups can access this computer remotely. Below I have explained how to add users and groups to the Remote Desktop Users group.
Related Article: Enable Remote Desktop using CMD.
Add users and groups to the Remote Desktop Users group.
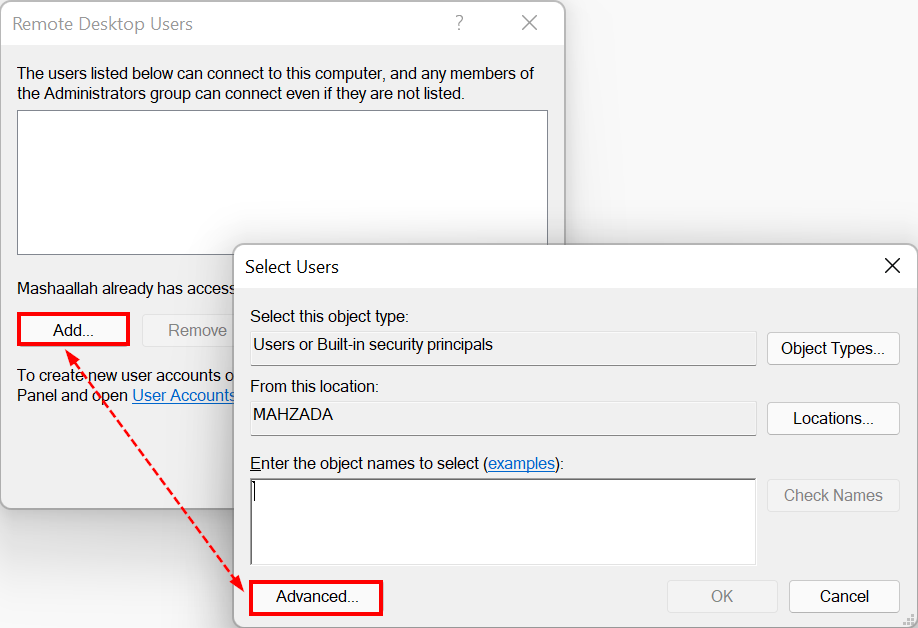
A more common way to add users and groups to another group is through group policy in Computer Management. But you can add users and groups to the Remote Desktop Users group from Remote Desktop settings or System Properties. Since I have explained enabling remote desktop through windows settings and System Properties, just one click on Select Users can get you to the screen below. Follow the steps below to add users and groups to the Remote Desktop Users group.
- Click Add to add users and groups to the Remote Desktop Users group.

- Click on Find Now, list of users and groups will appear. Select a user or a group, then click OK.
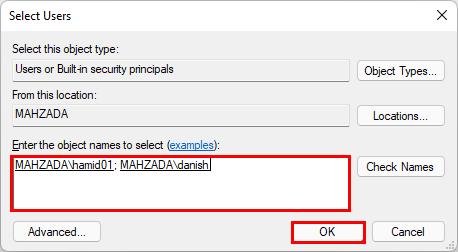
- Add the users and groups you want to have remote access then click OK.

- A list of the users added to the Remote Desktop Users group shows up here. To remove users from the Remote Desktop Users group, select user and click on remove. Click OK to apply the changes.
You can configure all the users on your computer to have remote access or configure specific users to have remote access. It is better to specify the user you allow to have remote access for security reasons.
You may also like to know How to use Remote Desktop (microsoft.com)
Connect to a Machine using Remote Desktop
Now that you enabled remote desktop on the target computer. Follow the steps below to connect the local management computer to the target computer remotely.
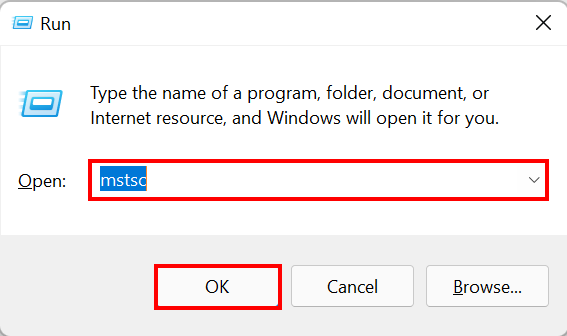
- Run the command
mstscin the local management computer.

- In the Remote Desktop Connection, type the IP address or name of the target computer.
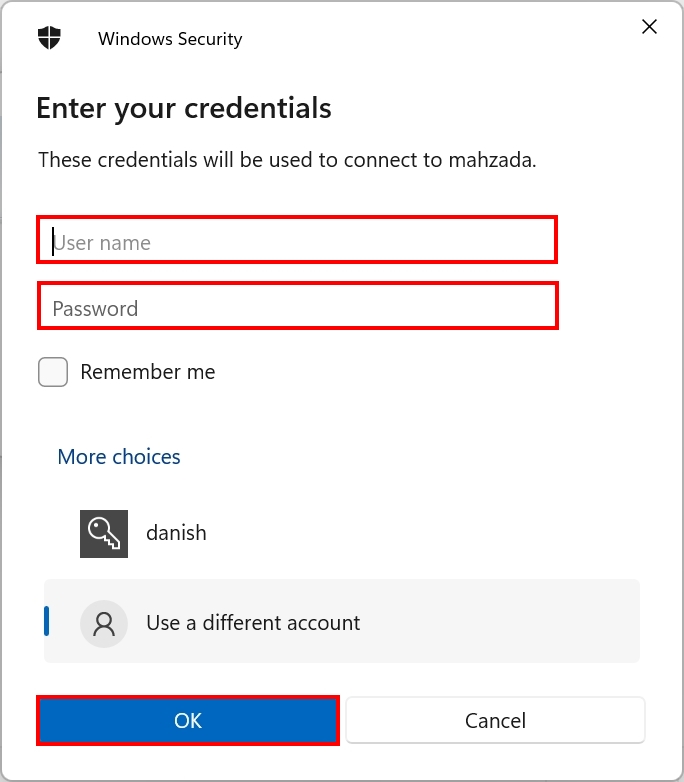
- When the screen below appears, enter a user’s credential that is a member of the Remote Desktop Users group. Type the username and password, then click OK.

Most of the configurations happen in the target to make a remote connection. In the local management computer (the computer you want to use for remote connection), open the Remote Desktop Connection, type the IP address of the target computer, and then log in with an authorised user. Enable remote desktop in the target computer (the computer you want to manage) and add users to the Remote Desktop Users group.
To know about remote servers in windows servers, click on How to Install Remote Server Administration Tools on Windows 10? (technig.com)
