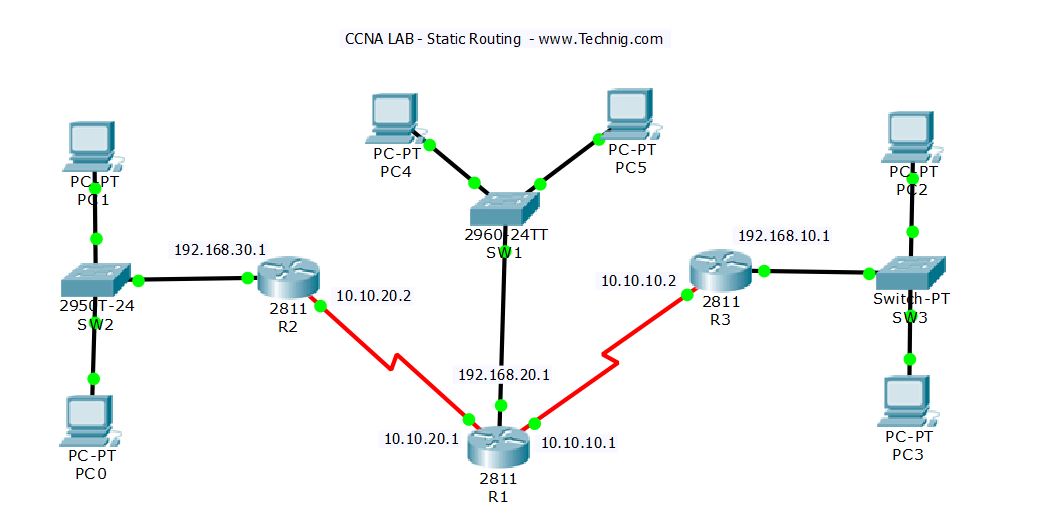
How to Configure Static Routing on Cisco Router?
How to Configure Static Routing on Cisco Router? Step by Step guide.
Configure Static Routing is the routing that network administrator configures the network routers manually, instead of using routing protocols RIP, OSPF, etc. which utilized in the dynamic routing. The benefits of static routing are minimum bandwidth usage, no overhead on router CPU and much more and perfect for a small network with a few routers. But it is not without cons. It ‘s hard to configure all routers manually in the vast network and troubleshooting is always harder than configuration.
As a network administrator or student of CCNA, you must know the configuration of static routing. It helps you understand the process and functions of routing in the network apparently.
Configure Static Routing Using Cisco Packet Tracer
To perform this task, you must create a lab and configure the basic IP addressing for all PCs and Routers or download my CCNA Lab – Static Route with Cisco packet tracer. CCNA Lab – Static Route – no Configure.

I have configured the Static Route the same as the screenshot, and it is not yet configured routing. You must configure it with below step by step Static Routing guide.
Static Routing command syntax: Ip route [destination network address] [mask] [next hop address or interface name]
1. In the R1 type the following commands to introduce two LANs 192.168.10.0/24 and 192.168.30.0/24 for Router 1.
R1(config)#ip route 192.168.30.0 255.255.255.0 10.10.20.2 150
R1(config)#ip route 192.168.10.0 255.255.255.0 10.10.10.2 150
2. Router2: Add three networks for router 2 and be sure that do not configure it with wrong IP address.
R2(config)#ip route 192.168.10.0 255.255.255.0 10.10.10.1 150
R2(config)#ip route 10.10.10.0 255.255.255.0 10.10.20.1 150
R2(config)#ip route 192.168.20.0 255.255.255.0 10.10.20.1 150
3. Router3: Do the same as router 2 but with different destination and exit interface address.
R3(config)#ip route 192.168.30.0 255.255.255.0 10.10.20.1 150
R3(config)#ip route 10.10.20.0 255.255.255.0 10.10.10.1 150
R3(config)#ip route 192.168.20.0 255.255.255.0 10.10.10.1 150
So it’s easy and not too much difficulty. If you want to accomplish this task, firstly you must try to understand the concept of routing and then try to configure it.
You can download the complete Static Routing Lab from the link below and look at the routing configuration with ‘show ip route or show run‘ commands. CCNA Lab – Static Route. If you have any question, please feel free to ask us.
Related Queries:
Static routing configuration in packet tracer
Static route example
How to configure static routing on 3 routers in packet tracer
Static routing example with a diagram
Static routing pdf
Default static route
Basic static route configuration

I used default route in R2 and R3, this is wrong?
I hadn’t thought of using containers but that’s a great idea. Thanks so much for sharing!
message sending failed
Step 1: Configure a recursive static route.
With a recursive static route, the next-hop IP address is specified. Because only the next-hop IP is specified,
the router must perform multiple lookups in the routing table before forwarding packets. To configure
recursive static routes, use the following syntax:
Router(config)# ip route network-address subnet-mask ip-address
a. On the R1 router, configure a static route to the 192.168.1.0 network using the IP address of the Serial
0/0/0 interface of R3 as the next-hop address.Write the command you used in the space provided.
b. View the routing table to verify the new static route entry.
How is this new route listed in the routing table?
From host PC-A, is it possible to ping the host PC-C?
These pings should fail. If the recursive static route is correctly configured, the ping arrives at PC-C. PC-C
sends a ping reply back to PC-A. However, the ping reply is discarded at R3 because R3 does not have a
return route to the 192.168.0.0 network in the routing table.
Step 2: Configure a directly connected static route.
With a directly connected static route, the exit-interface parameter is specified, which allows the router to
resolve a forwarding decision in one lookup. A directly connected static route is typically used with a point-topoint
serial interface. To configure directly connected static routes with an exit interface specified, use the
following syntax:
Router(config)# ip route network-address subnet-mask exit-intf
a. On the R3 router, configure a static route to the 192.168.0.0 network using S0/0/0 as the exit interface.
Router3# config t
Enter configuration commands, one per line. End with CNTL/Z.
Router3(config)# ip route 192.168.0.0 255.255.255.0 10.1.1.2
%Invalid next hop address (it’s this router)
these are the steps I am following where am I going wrong?
I used your technig in my own task, and it worked just fine. Thank you 🙂
Maybe this exercise isn´t right?
If you packet for lan 192.168.10.0 is in R2, your next hop is 10.10.20.1 not 10.10.10.1…
R2(config)#ip route 192.168.20.0 255.255.255.0 10.10.20.1 150
Because R1 already have a route to get this network
ip route 192.168.10.0 255.255.255.0 10.10.10.2 150
Any thoughts?
My corret answer for this example is this:
R1(config)#ip route 192.168.30.0 255.255.255.0 10.10.20.2 150
R1(config)#ip route 192.168.10.0 255.255.255.0 10.10.10.2 150
R2(config)#ip route 192.168.10.0 255.255.255.0 10.10.20.1 150
R2(config)#ip route 192.168.20.0 255.255.255.0 10.10.20.1 150
R3(config)#ip route 192.168.30.0 255.255.255.0 10.10.10.1 150
R3(config)#ip route 192.168.20.0 255.255.255.0 10.10.10.1 150
For me works, i see pings in all networks.
Any comment??
Thanks
Static Route configuration in packet Tracer with simple topology
the last hope address in this demonstrated commands is wrong,
On R2
R2(config)#ip route 192.168.10.0 255.255.255.0 10.10.20.1 150
R2(config)#ip route 10.10.10.0 255.255.255.0 10.10.20.1 150
R2(config)#ip route 192.168.20.0 255.255.255.0 10.10.20.1 150
R3(config)#ip route 192.168.30.0 255.255.255.0 10.10.10.1 150
R3(config)#ip route 10.10.20.0 255.255.255.0 10.10.10.1 150
R3(config)#ip route 192.168.20.0 255.255.255.0 10.10.10.1 150