How to Configure RIPng on Cisco Router?
Configure RIPng Routing on Cisco Router using GNS3 for CCNP Exam.
This is a simple guide to configure RIPng on Cisco router using GNS3 for CCNP Exam or real word network routing. The Routing Information Protocol (RIP) is a distance-vector routing protocol that uses hop count as a routing metric. RIP is an Interior Gateway Protocol (IGP) most commonly used in smaller networks. RIP for IPv6 also commonly referred as RIPng (Routing Information Protocol Next Generation) is designed to support IPv6 and functions the same way as RIP-v2 in IPv4. RIPng uses FF02::9 as the destination address for RIP update messages.
Configure RIPng on Cisco Router for CCNP Exam
Have you ever configured RIP on Cisco Router? If yes, you know the simplicity or RIP configuration for IPv4. Its simpler as RIP configuration to configure RIPng on Cisco Router or Switch. Just follow this simple step by step guide to configure RIPng using GNS3 or real Cisco Routers.

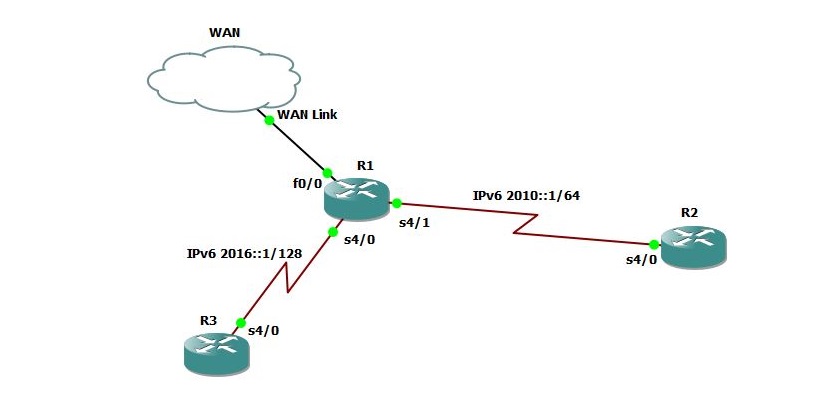
Le’s start it using the above RIPng on GNS3 CCNP Lab. Create your own lab within GNS3 and configure RIPng using GNS3.
1. Try to set IPv6 address to s4/0 and s4/1 on R1 router with the below IPv6 address. You can set IPv6 address on Loopback interfaces, but in this Lab, I’m doing on router serial interfaces.
R1#configure terminal
Enter configuration commands, one per line. End with CNTL/Z.
R1(config)#ipv6 unicast-routing
R1(config)#interface s4/0
R1(config-if)#ipv6 address 2016::1/128
R1(config-if)#no shutdown
R1(config-if)#exit
R1(config)#
R1(config)#interface s4/1
R1(config-if)#ipv6 address 2010::1/128
R1(config-if)#no shutdown
2. Do the IPv6 configuration on R2 like the below configuration.
R2#configure terminal
Enter configuration commands, one per line. End with CNTL/Z.
R2(config)#ipv6 unicast-routing
R2(config)#interface s4/0
R2(config-if)#ipv6 address 2010::2/128
R2(config-if)#no shutdown
R2(config-if)#exit
3. Now configure the R3 router also with the below IPv6 address.
R3#configure terminal
Enter configuration commands, one per line. End with CNTL/Z.
R3(config)#ipv6 unicast-routing
R3(config)#interface s4/0
R3(config-if)#ipv6 address 2016::2/128
R3(config-if)#no shutdown
R3(config-if)#exit
The RIPng GNS3 CCNP Lab is ready to configure RIPng and enable routing on this network. Just do it with “IPv6 rip” command on serial interfaces.
4. Enable RIPng on all routers interfaces which we configure them with IPv6.
R1:
R1#configure terminal
Enter configuration commands, one per line. End with CNTL/Z.
R1(config)#interface s4/0
R1(config-if)#ipv6 rip RIPngTest enable
R1(config-if)#exit

R1(config)#interface s4/1
R1(config-if)#ipv6 rip RIPngTest enable
R1(config-if)#exit
R2:
R2#configure terminal
Enter configuration commands, one per line. End with CNTL/Z.
R2(config)#interface s4/0
R2(config-if)#ipv6 rip RIPngTest enable
R2(config-if)#exit
R3:
R3#configure terminal
Enter configuration commands, one per line. End with CNTL/Z.
R3(config)#interface s4/0
R3(config-if)#ipv6 rip RIPngTest enable
R3(config-if)#exit
That’s all. The Lab is ready and RIPng routing is enabled on all routers. Now the routers can communicate with each other. Let’s test it.
Test RIPng connectivity with Ping IPv6
Simply test with ping command from R2 router to R3 router IPv6 address.
R2#ping ipv6 2016::1
Type escape sequence to abort.
Sending 5, 100-byte ICMP Echos to 2016::1, timeout is 2 seconds:
!!!!!
Success rate is 100 percent (5/5), round-trip min/avg/max = 12/19/32 ms
R2#
Yes, it ping and replied successfully from R2 to R3.
If you have more routers, try to configure them one by one and then test them. It’s better to test from PCs and switches also.
Have any question about RIPng? Try to ask us and also help us to make better articles with your suggestions.
Related Search for GNS3 CCNP Lab:
What is RIPng?
RIPng Configuration GNS3.
RIPng Command.
show ipv6 rip RIPng database.
ipv6 routing not enabled.
ccnp switch labs.
ccnp labs pdf.
gns3 labs for beginners.
gns3 labs for ccnp switch.
ccnp labs free.
gns3 tutorial.
