How to Configure PAP and CHAP in Cisco Router?
Easy PAP and CHAP Configuration in Cisco Router Step by Step guide.
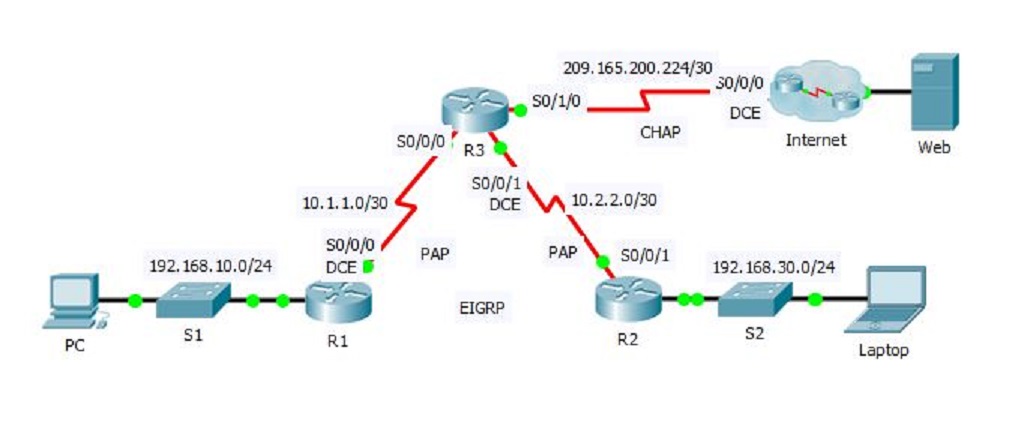
It’s a simple way you can learn to configure PAP and CHAP in Cisco router using this packet tracer lab. Just download the lab or create your own lab with packet tracer and follow the instruction to easy configure PAP and CHAP authentication protocols in a Cisco router.

Configure PAP and CHAP in Cisco Router
In this activity, you will practice configuring PPP encapsulation on serial links. You will also configure PPP PAP
authentication and PPP CHAP authentication.
Part 1: Review Routing Configurations
Step 1: View running configurations on all routers.
- While reviewing the router configurations, note the use of both static and dynamic routes in the topology.
Step 2: Test connectivity between computers and the web server.
- From PC and Laptop, ping the web server at 209.165.200.2. Both ping commands should be successful.
Remember to give enough time for STP and EIGRP to converge.
Part 2: Configure PPP as the Encapsulation Method
Step 1: Configure R1 to use PPP encapsulation with R3.
Enter the following commands on R1:
R1(config)# interface s0/0/0
R1(config-if)# encapsulation ppp
Step 2: Configure R2 to use PPP encapsulation with R3.
Enter the appropriate commands on R2:
R2(config)# interface s0/0/1
R2(config-if)# encapsulation ppp
Step 3: Configure R3 to use PPP encapsulation with R1, R2, and ISP.
Enter the appropriate commands on R3:
R3(config)# interface s0/0/0
R3(config-if)# encapsulation ppp
R3(config)# interface s0/0/1
R3(config-if)# encapsulation ppp
R3(config)# interface s0/1/0
R3(config-if)# encapsulation ppp
Step 4: Configure ISP to use PPP encapsulation with R3.
a. Click the Internet cloud, then ISP. Enter the following commands:
Router(config)# interface s0/0/0
Router(config-if)# encapsulation ppp
b. Exit the Internet cloud by clicking Back in the upper left corner or by pressing Alt+left arrow.
Step 5: Test connectivity to the web server.
PC and Laptop should be able to ping the web server at 209.165.200.2. This may take some time as
interfaces start working again and EIGRP reconverges.
Part 3: Configure PPP Authentication
Step 1: Configure PPP PAP Authentication Between R1 and R3.
Note: Instead of using the keyword password as shown in the curriculum, you will use the keyword secret to
provide a better encryption of the password.
a. Enter the following commands into R1:
R1(config)# username R3 secret class
R1(config)# interface s0/0/0
R1(config-if)# ppp authentication pap
R1(config-if)# ppp pap sent-username R1 password cisco
b. Enter the following commands into R3:
R3(config)# username R1 secret cisco
R3(config)# interface s0/0/0
R3(config-if)# ppp authentication pap
R3(config-if)# ppp pap sent-username R3 password class
Step 2: Configure PPP PAP Authentication Between R2 and R3.
Repeat step 1 to configure authentication between R2 and R3 changing the usernames as needed. Note that
each password sent to each serial port matches the password expected by the opposite router.
R2(config-if)# username R3 secret class
R2(config)# interface s0/0/1
R2(config-if)# ppp authentication pap
R2(config-if)# ppp pap sent-username R2 password cisco
R3(config-if)# username R2 secret cisco
R3(config)# interface s0/0/1
R3(config-if)# ppp authentication pap
R3(config-if)# ppp pap sent-username R3 password class
Step 3: Configure PPP CHAP Authentication Between R3 and ISP
a. Enter the following commands into ISP. The hostname is sent as the username:
Router(config)# hostname ISP
ISP(config)# username R3 secret cisco
ISP(config)# interface s0/0/0
ISP(config-if)# ppp authentication chap
b. Enter the following commands into R3. The passwords must match for CHAP authentication:
R3(config)# username ISP secret cisco
R3(config)# interface serial0/1/0
R3(config-if)# ppp authentication chap
Step 4: Test connectivity between computers and the web server.
From PC and Laptop, ping the web server at 209.165.200.2. Both ping commands should be successful.
Remember to give enough time for STP and EIGRP to converge.
Step 4: Test connectivity between computers and the web server.
From PC and Laptop, ping the web server at 209.165.200.2. Both ping commands should be successful.
Remember to give enough time for STP and EIGRP to converge.
Note: This is the Cisco Network Academy lab, you can join the netacad.com website to learn the entire CCNA.
Download the Lab: PAP and CHAP Configuration or CCNA Packet Tracer Lab
That is all you need to learn to configure PAP and CHAP in Cisco Router. Let’s see what is the difference between PAP and CHAP authentication protocols?
What is the Difference Between PAP and CHAP?
The password authentication protocol (PAP) and challenge handshake authentication protocol (CHAP) are both used to authenticate PPP sessions and can be used with many VPNs. Basically, PAP works like a standard login procedure; the remote system authenticates itself to the user a static username and password combination. The password can be encrypted for additional security, but PAP is subject to numerous attacks. In particular, since the information is static, it is subject to password guessing as well as snooping.
CHAP takes a more sophisticated and secure approach to authentication by creating a unique challenge phrase (a randomly generated string) for each authentication. The challenge phrase is combined with device hostnames using one-way hashing functions to authenticate in a way where no static secret information is ever transmitted over the wire. Because all transmitted information is dynamic, CHAP is significantly more robust than PAP.
Another advantage of CHAP over PAP is that CHAP can be set up to do repeated midsession authentications. This is useful for dial-up PPP sessions and other sessions where a port may be left open even though the remote device has disconnected. In this case, its possible for someone else to pick up the connection mid-session simply by establish physical connectivity.
Related Search:
- PPP pap configuration
- PPP chap configuration
- Configure chap authentication on s0/0/0
- pap chap configuration

A question:
How to implement Quality of service in ASA firewall?
love the coding