Configure Windows Deployment Services on Server 2012 R2?
The first part of Windows Deployment Services was about the Installation of WDS on Windows Server 2012 R2. Read it from ‘How to Install and Configure WDS In Windows Server 2012 R2‘. But in the second part of WDS, we will show you how to add Windows Images for deploying, creating Boot Image and Capture Image for capturing the reference PC which is a custom image’s of a Windows operating system. So I don’t talk anymore and let’s deploy clients with Windows Deployment Services using Windows Server 2012 R2.
Add Image To Windows Deployment Services
We need to add two types of images in WDS, install.wim and boot.wim. Then install.wim images are the operating system images that you deploy to the client computer. You can also use the Install.wim file from the installation media (in the \Sources folder of Windows DVD), or you can create your own custom images.
To boot your system through the network card, you must add the boot.wim image of the latest Windows Operating System. The Boot.wim images are Windows PE images that you boot a client computer to perform an operating system installation. In most scenarios. Boot.wim image is also located in the Sources folder of Windows DVD.
While you are login in as a domain admin or member of the Administrators group to WDS Server, go to Server Manager and open Windows deployment services from the Tools tab of Server Manager Dashboard.

Expand the Servers then right-click the Install Images and click Add Install Image.

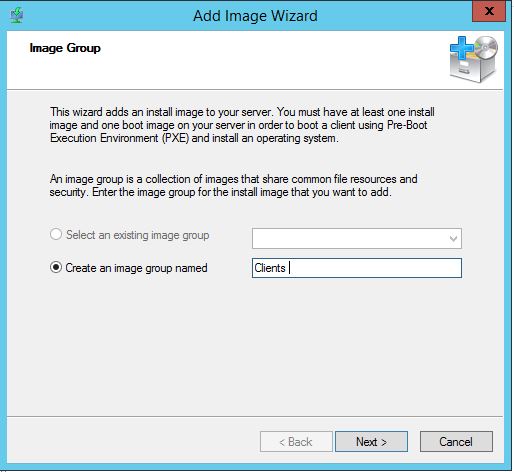
On the Add Image, Wizard page type the name of a group and click Next.

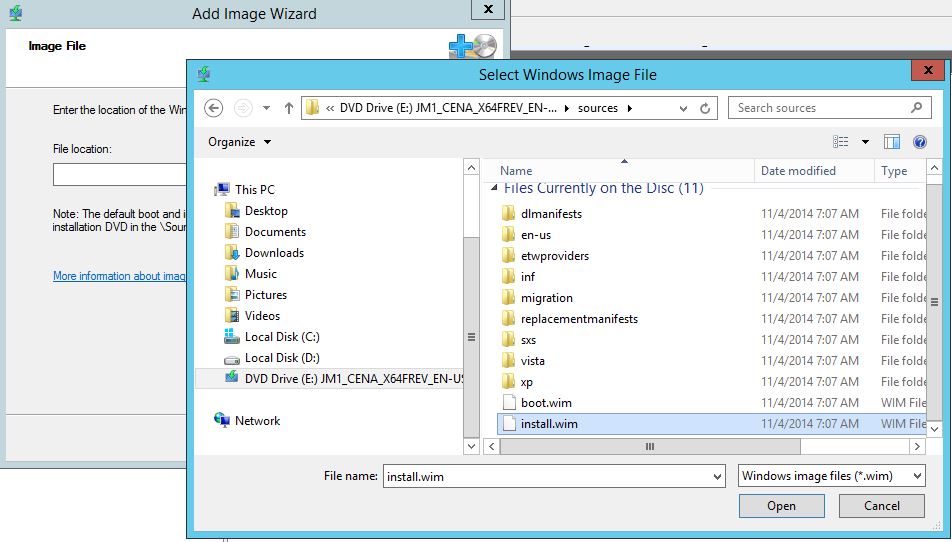
On the Image, Files page click Browse and select the install.wim image from Windows sources folder and click Open and then click Next.

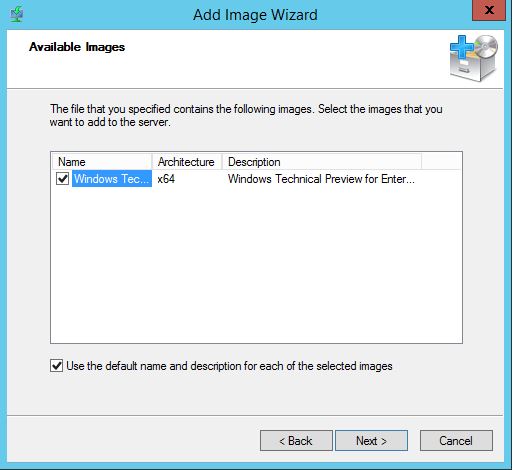
On the Available Images pages select Windows edition, whatever you want and click Next. Here we only have Windows 10 technical preview for the enterprise.

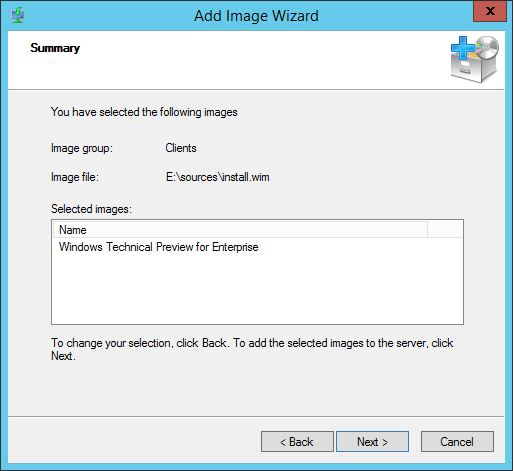
It will take a few minutes to check the integrity of image’s and adding images. When the image added successfully, just click Finish and see the Clients group that has the image ready for deploying to clients machines.

That is it. You can add as much as Image you want. But now try to add the Boot.wim image the same as an Install image. But instead of install.wim image select boot.wim image.

Now you can deploy and install Windows 10 for your network clients. In the next part, we will install the client operating system through the network using WDS.
Configure WDS on Windows Server 2016 – Video Tutorial

Your articles on WDS are very helpful. Thank you for taking the time to write them! I really appreciate it.
Your welcome MondQ, I’m glad that you find the article helpful
i would like to know. with windows 7 and 8 we only add the install images in the deployment workbench. is it now different with windows 10 where the install image MUST be in the windows deployment service (install image ) folder if so do you still build a task sequence for windows 10 in the deployment workbench under task manager
it seems you work with MDT and WDS. There is not changes for Windows 10 deployment. It works like Windows 7 and 8.1. Read this post about deploying Windows 10 using MDT
Thank for that useful bit of information. so basically nothing has really changes for deploying windows 10.
do you have steps on how to configure windows 10 with ADK to create a unattended install and sysprep process
Hi Shais,
This series of articles have been great in helping me try and set up and troubleshoot WDS at my organization. However, I am still running into one small snag… I am able to upload the Windows 10 boot.wim file to my server without a problem. However, after I select “Create Capture Image”, the bar will fill up as if it’s working and then it’ll say that it’s completed with an error message of “Access is Denied”. I’ve tested this on Win7 and 8.1 boot.wim images and was able to create Capture Images without a problem- it’s just the Windows 10 one that’s giving me trouble. Have you heard of this or run into it before?
Hi Tom,
Once check you user account privilege. Do you have the exact right to add boot image to WDS?
Here is the same issue you have with Windows 10. WDS Access Denied Error.
Nice Article. Please keep writing and share your knowledge . Thanks